Monday, December 20, 2010

Understanding Recording and Configuration Options in Lync 2010

The Lync client comes equipped with full recording capabilities for both peer to peer conversations and conferencing.  This includes the ability to record audio, video, IM, and shared content.  With this great functionality (and great power) comes the need to control it.  Note that recording is not enabled by default.

This post will be separated into two parts: Administration and Client Experience.

Administration

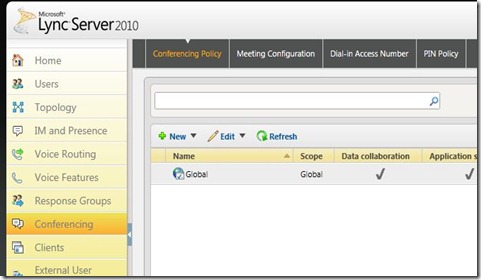
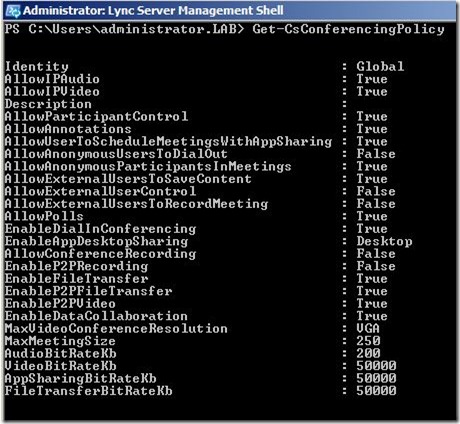
Recording options are configured within the Conferencing Policy on the Lync server.  You can view and configure the policy by either navigating within the Lync Control Panel (LCP) to the Conferencing node or through the Lync Management Shell (LMS) using the CsConferencingPolicy commands.

LCP:

LyncRec - LCP - conf

LMS:

LyncRec - ConfPol1 - shell

Note: The above policies are looking at the Global Policy for conferencing.  If more granular policies are needed, then multiple policies can be created.

There are three parameters that are configurable that effects recording capabilities:

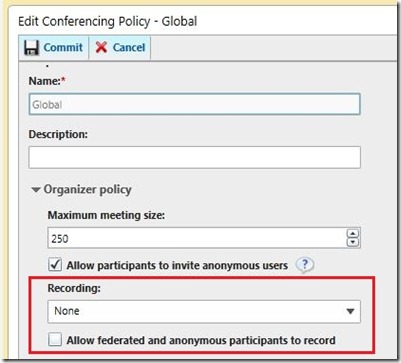
  • AllowConferencingRecording – Indicated whether users are allowed to record the meeting, and applies to all users taking part in the conference (default value is false)
  • AllowExternalUsersToRecordMeeting – Indicated whether external users (anonymous or federated) are allowed to record the meeting.  Note that this applies to the user who organizes the conference (default value is false and is dependent on the AllowConferencingRecording value set to true)
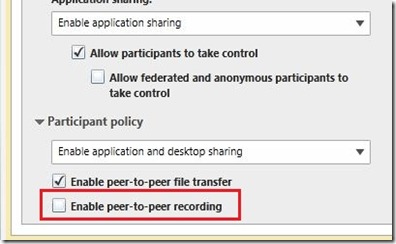
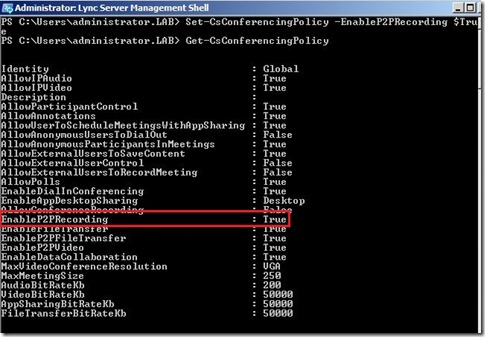
  • EnableP2PRecording – Indicates whether users will be able to record peer-to-peer sessions. (default value is false)

To enable one or all of these settings, within the LCP –> Conferencing –> Conferencing Policy tab, open the Global (or desired) policy.  Configure the settings as shown below:

LyncRec - ConfPol1 - markup

LyncRec - ConfPol2 - markup

Or these parameters can be set utilizing the Set-CsConferencingPolicy command.  In the following example, I enable P2PRecording with the following command:

Set-CsConferencingPolicy –EnableP2PRecording $True

LyncRec - EnableP2PRec - shell and output - markup

Client Experience

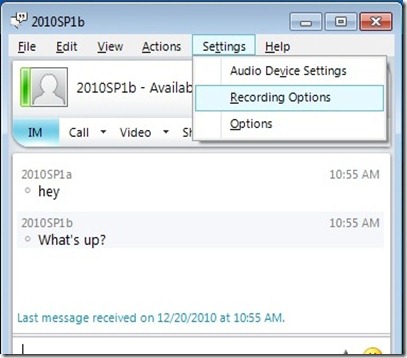
Now that users have been enabled for recording, the Lync client will have additional menu choices.  Within a conversation, a user can set their Recording Options by clicking the Alt key and selecting Settings –> Recording Options.

LyncRec - Menu-RecOptions

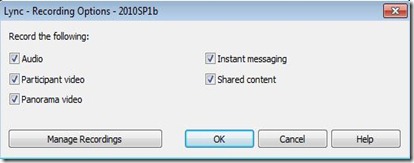
This will bring up the ability to set what modalities the user wants to configure to record.

LyncRec - RecOptions

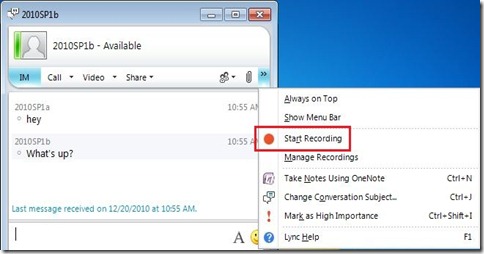
During a conversation, a user can initiate a recording by selecting Start Recording option from the menu picks.

LyncRec - Menu-StartRec - startmarkup

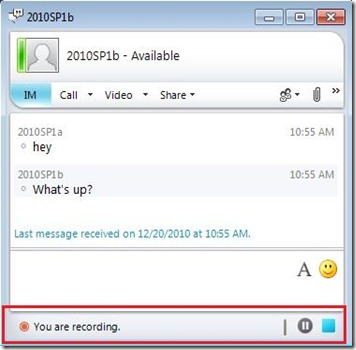
While a conversation is being recorded the initiator will see:

LyncRec - Client - Recording - markup

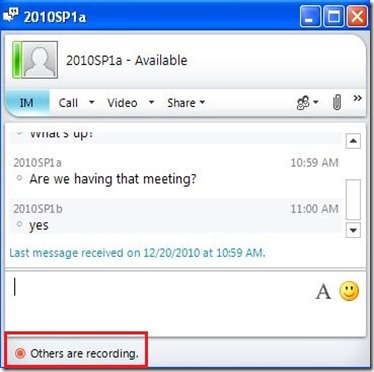
And the attendee will see (if they are also using a Lync client):

LyncRec - Client - Recording - attendee view - markup

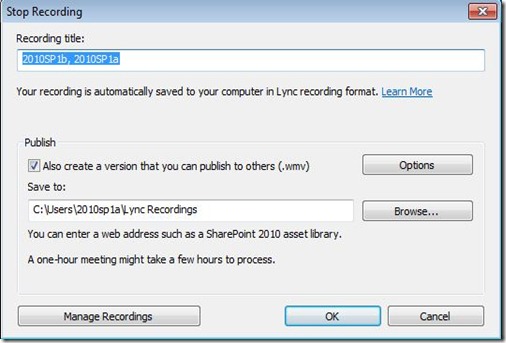
Once the recording has stopped, the Lync client will start processing the recording.  The initiator will be able to change any last minute options and also create a one-file *.wmv format of the recording (along with the multi-file native Lync format). 

LyncRec - Client - Recording - StopOptions

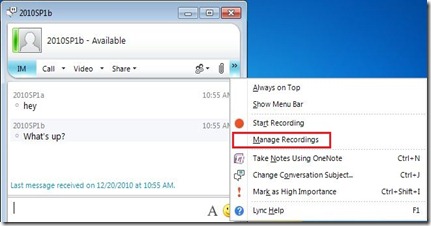
When Lync is installed, another component called the Lync Recording Manager is also installed.  This is the tool that will be used to view, publish, and manage recorded conversations.  You can access the Recording Manager either by accessing the program from the Start Menu, by clicking the System Tray icon, or by selecting Manage Recordings from within the client.

System Tray:

LyncRec - recordmgr - systray - markup

Client – Manage Recordings:

LyncRec - Menu-StartRec - manage markup

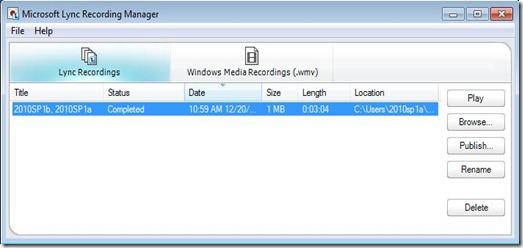
This will launch the Lync Recording Manager:

LyncRec - recordmgr - client

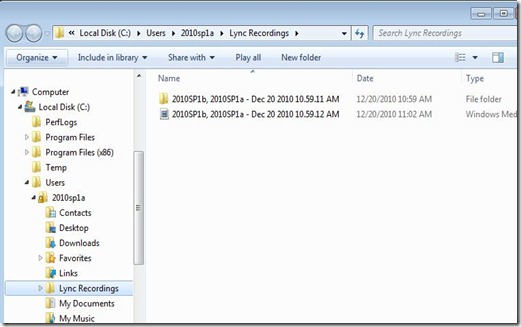
Note that options to Play, Browse, Publish, and Rename are available within the client.  To access the native files, you can click browse.  By default the recordings are saved in the user’s windows profile under the Lync Recordings folder.  Both the single file *.wmv and the multi-file Lync recording will be in this folder:

LyncRec - recordmgr - browse - wmv

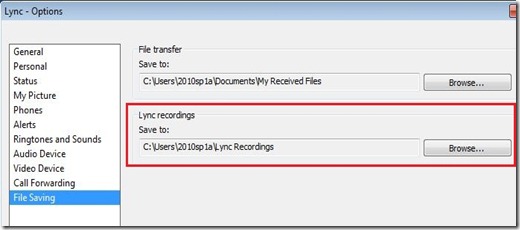
The default recording location can be changed within the users’ client options:

LyncRec - SaveLocation - markup

As always, comments welcome.

Tuesday, December 14, 2010

Exchange 2010 SP1 Update Rollup 2 and Exchange 2010 Update Rollup 5 Available

An update for Exchange 2010 SP1 has just released and can be downloaded at: Exchange 2010 SP1 Update Rollup 2 Download

  • For a description of all the included fixes, see KB 2425179
An update for Exchange 2010 RTM has just released and can be downloaded at: Exchange 2010 Update Rollup 5 Download

  • For a description of all the included fixes, see KB 2407113
For those of you running DAGs, please see the following article: Applying Updates to Exchange 2010 SP1 

If you are running Forefront, it is important to disable Forefront protection during the update:
  • Before running patch: fscutility /disable
  • After running patch: fscutility /enable

Exchange 2007 SP3 Update Rollup 1 and Exchange 2007 SP2 Update Rollup 5 Available

An update for Exchange 2007 SP3 has just released can be downloaded at: Exchange 2007 SP3 Update Rollup 2 Download
  • For the list of all the included fixes, see KB 2407025
An update for Exchange 2007 SP2 has just released can be downloaded at: Exchange 2007 SP2 Update Rollup 5 Download
  • For the list of all the included fixes, see KB 2407132
If you have a clustered environment, please see this article: Applying Exchange 2007 Update Rollups to Clustered Mailbox Servers

Monday, December 6, 2010

Repairing an Invalid Certificate (for Exchange or Lync/OCS)

Certificates are a part of Exchange and OCS/Lync, there is no getting away from them.  Because of this, I have seen numerous issues not only around the names in a certificate (another future post), but also with provisioning certificates. 

Exchange and OCS/Lync are programmed to not allow the use of invalid certificates.  The two top reasons that I see invalid certificates have to do with:

  • Missing private key
  • Certificate Chain issues

Missing Private Key

There are several reasons that a certificate can have a missing private key.  These include, but are not limited to:

  • Did not complete the pending certificate request from the originating server
  • Import a .cer or .crt file into the certificate store
  • Export a certificate without including the private key and then import on a different server

So now that we have a certificate without the private key, what do we do now?  Well, you can either reissue the certificate and work with your CA to get a new certificate or we can try to repair the certificate’s private key.  The later is the path of least resistance.  So let’s look at that process.

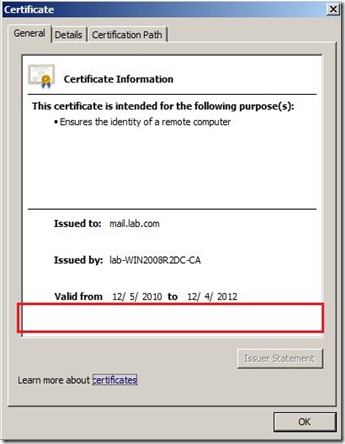
By opening the troubled certificate in the Certificates MMC Snap-in, we can see that the certificate does not have the private key.

Cert - no PK - markup

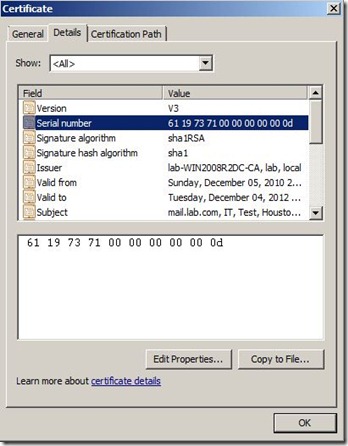
To repair the key, we will need to get the certificate’s Serial Number.  We can do that from the Details Tab of the certificate.

Cert - Serail num

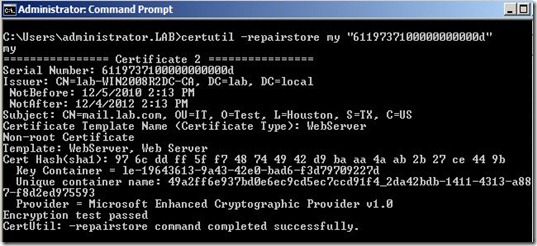
Now we will open a command prompt and run the following command:

certutil –repairstore my “SerialNumber”

Cert - CMD Repairstore

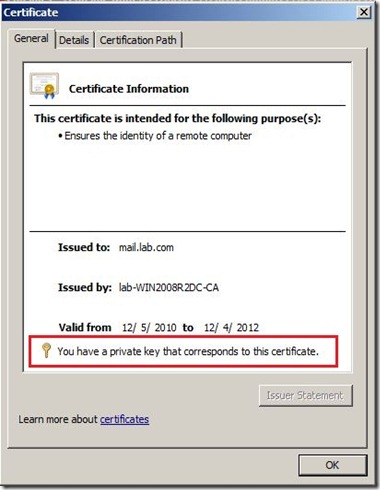
After running the command and refreshing the Certificates MMC Snap-in, we can reopen the troubled certificate and see that it now has a valid private key:

Cert - with PK - markup

Now the certificate will be available to select in Exchange or OCS/Lync to utilize.

If this process does not work, then you will have to reissue your certificate and request a new certificate from your CA.

Certificate Chain Issue

The other main issue with invalid certificates have to do with getting the Certificate Chain installed appropriately.  Most certificate chain issues can be viewed from the Certificate Path tab of the certificate properties.  CA’s usually have detailed instructions and downloads of the chains.  I suggest you work with the CA to install the certificate chain properly as they are all different and have different requirements.

Digicert has a great web-based utility to test and uncover certificate chain related issues.  Navigate to:

http://www.digicert.com/help

I hope this helps!  I know this has saved me quite a bit of time over the years.

Wednesday, December 1, 2010

BUG: Exchange 2010 Personal Archive Display Name in Outlook 2010

This post is based on Exchange 2010 SP1 with Update Rollup 1 and Outlook 2010 with latest updates.

Let’s consider that we would like the name of the Personal Archive to be more descriptive for our users.  We can change the Display Name for the archive to display whatever we want.  There appears to be a bug with the display name of the Personal Archive Display Name in Outlook 2010.  OWA displays the name correctly. 

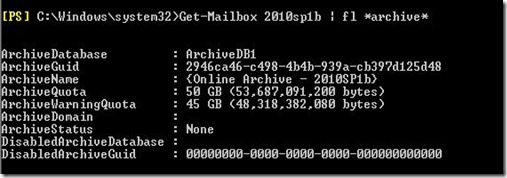
Let’s look at default settings of my Personal Archive by running the following command:

Get-Mailbox 2010sp1b | fl *archive*

ArchErr - EMS - before

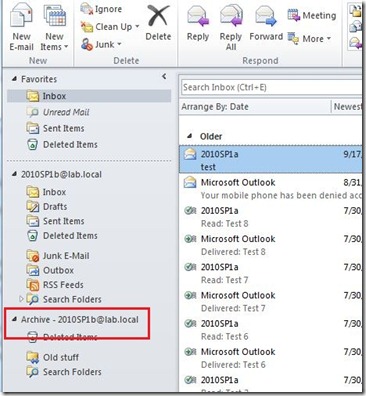
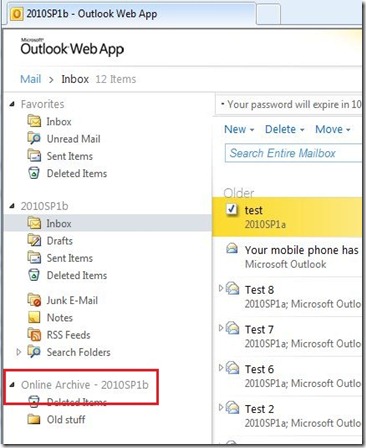
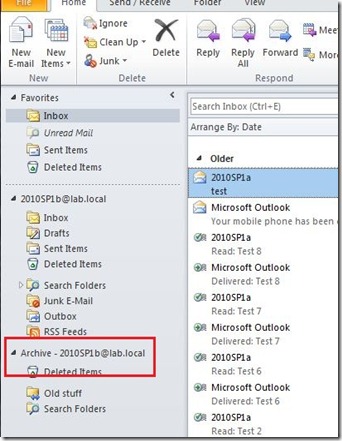
The default view from Outlook 2010 doesn’t match the exact Display Name of “Online Archive – 2010SP1b” as shown above from the “ArchiveName” parameter:

ArchErr - Outlook - before - markup

The default view from OWA does match the “ArchiveName” parameter:

ArchErr - OWA - before - markup

Now let’s change the “ArchiveName” parameter to something more descriptive by running the following command:

Set-Mailbox 2010sp1b –ArchiveName “KEEP FOREVER”

ArchErr - EMS - after

Again, the view in Outlook 2010 does not update to match the “ArchiveName” parameter:

ArchErr - Outlook - after - markup

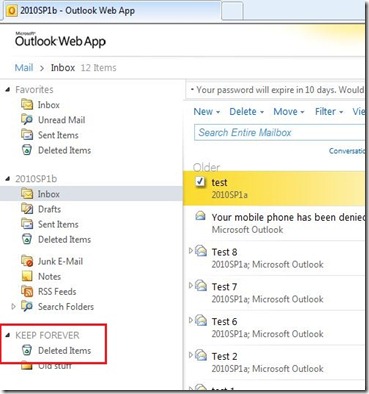
But, OWA 2010 does update to match:

ArchErr - OWA - after - markup

Anyone know of or have a fix to force Outlook 2010 to update the Archive Display Name?

Monday, November 22, 2010

OCS November 2010 Updates Released (CU8)

The latest round of OCS updates are available for download.  There are quite a few updates/fixes for this round.  Most notably are updates to help with issues uncovered in a Lync-OCS coexistence scenario.  Still, important to keep your installation updated. 

Here are the components that were updated for this round of updates:

Server Updates (6907.221) - KB 968802

  • Application Sharing Server
  • A/V Conferencing
  • Core Components
  • Conferencing Attendant
  • Conferencing Announcement Service
  • Mediation Server
  • Standard/Enterprise Edition Server
  • Standard/Enterprise Edition Server Back-End
  • UCMA 2.0 Core Redist

Note:  As always, the easiest way to make sure your server is up to date across all components is to use the Cumulative Server Update Installer (ServerUpdateInstaller.exe package)

Client Updates

Misc.

Monday, November 15, 2010

Enabling Skill Search in Lync 2010

Lync not only allows you to search for people across your organization by name, but also by skillset.  This is great if I am looking for someone who is an SCCM expert or a Business Analyst.  I don’t always know who I am looking for, but usually know what kind of person I am looking for. 

Skill based search integrates will SharePoint 2007 and 2010.  It is not enabled by default in Lync server.  First let’s look at what is required on the backend to make this work:

  • Requires SharePoint 2007 or later with maintained MySites
  • SharePoint search center URL is provisioned via in-band settings
  • SharePoint must be published to the Internet
  • Requires full version of SharePoint – Windows SharePoint Services are not sufficient
To enable skill based search, a Client Policy must be configured and applied that configures the Lync client to look at the correct SharePoint URLs.  Let’s look at the different parameters that are used to configure the Client Policy:
  • SPSearchInternalURL and SPSearchExternalURL – the URL that Lync will use when the user is logged on either inside or outside the network when conducting a keyword search
Note: the SPSearchInternalURL and SPSearchExternalURL will follow the following format: http://<server>/_vti_bin/search.asmx
  • SPSearchCenterInternalURL and SPSearchCenterExternalURL  – the URL that Lync will display at the bottom of the client that will open up the native people search webpage hosted on the SharePoint site. This can be used to view more detailed results.

Note: the SPSearchCenterInternalURL and SPSearchCenterExternalURL will follow the following format: http://<server>/SearchCenter/Pages/PeopleResults.aspx

To enable these URLs, a Client Policy needs to be configured and applied.  Since I am choosing to make this feature available to everyone, I am going to use the Lync Global Policy that applies to everyone. 

The following commands are run to enable the Skill based search URLs:

Set-CSClientPolicy –SPSearchInternalURL http://<server>/_vti_bin/search.asmx

Set-CSClientPolicy –SPSearchExternalURL http://<server>/_vti_bin/search.asmx

Lync SS - skill url - markup
The following commands are run to enable the Search Center URL that will be displayed at the bottom of the search results:

Set-CSClientPolicy –SPSearchCenterInternalURL http://<server>/SearchCenter/Pages/PeopleResults.aspx

Set-CSClientPolicy –SPSearchCenterExternalURL http://<server>/SearchCenter/Pages/PeopleResults.aspx

Lync SS - peopleresults url = markup
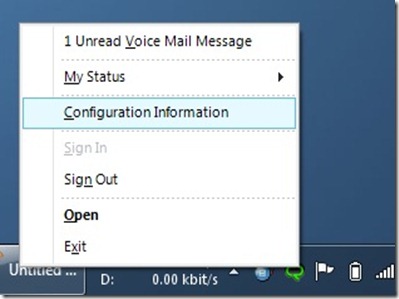
The next time the Lync client is restarted, it will receive the SharePoint URLs through in-band provisioning.  You can verify that your Lync client has received the URLs by holding the Ctrl key down, right-clicking on your Lync system tray icon and selecting Configuration Information:

Lync SS - config info select
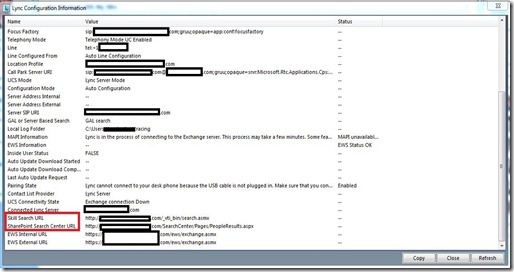
The SharePoint URLs are shown in the Configuration Information table:

Lync SS - Config Info - markup
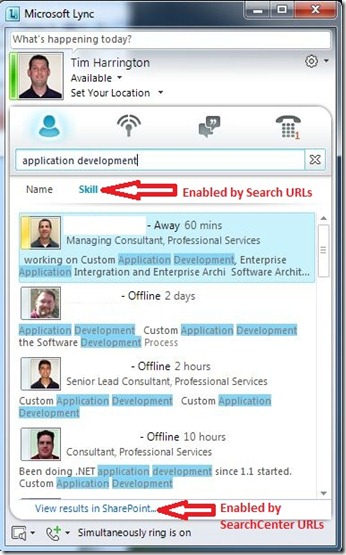
Now back to the Lync Client.  In the search blank, we can enter in keywords to skills that we want to search across and select the “Skill” option:

Lync SS - client search - mark2
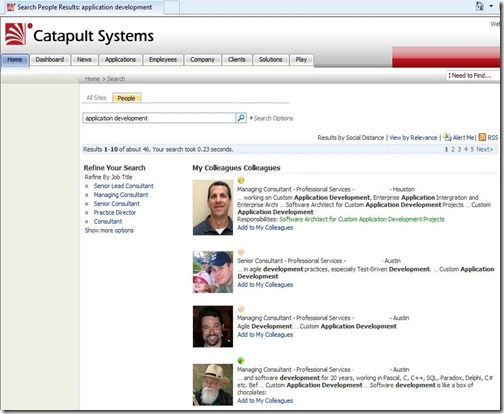
Notice the “View results in SharePoint…” link at the bottom of the search results.  Clicking this will take you to the native SharePoint People Search Center for a more detailed view of the results:

Lync SS - SearchCenter = mark
The new Skill Search integration between SharePoint and Lync is a powerful addition to the feature set.  As always, comments welcome.
UPDATE (2/22/2011) - Gus Fraser posted about a publishing the SharePoint URLs through TMG.  Be sure to check it out if this matches your scenario!

Monday, November 8, 2010

Lync Conferencing Client Comparisons

Lync brings a much more seamless web conferencing experience to the user.  No longer does the user have to decide whether to create a Live Meeting or a Conference Call, there is now just an Online Meeting.  The join experience is very seamless to the user with an option for a no-download web client to attend the meeting.

Lync offers the user three options to attend an Online meeting.  Lync will check the local computer that is launching the Online Meeting for the best client available and use that to connect.  The order of checking the client follows:

  1. Lync client – this is the full client that is used by domain users and federated contacts for daily use
  2. Attendee client – a downloaded client (much like the Live Meeting client) that gives the user the ability to fully participate in an Online Meeting.  Download here: Admin or User version
  3. Lync Web App – web client that will allow users to connect to a meeting with no download required

So now you are asking: What is the difference between the clients and what is the user experience like?  Note: This table only describes the different functionality of each client within the conferencing experience.
Feature/Capability Lync Client Attendee Client Lync Web App
Computer Audio X X  
Video X X  
Use Presenter Controls X X X
Access detailed meeting roster X X X
Multiparty IM X X X
Share desktop X X X (plug-in)
Share application X X X (plug-in)
Add anonymous participants X X X
Use dial-in audio conf. X X X
Initiate a meeting X    
Add and present PowerPoint files X X  
Whiteboard X X X
Polling X X X
File Sharing X X X

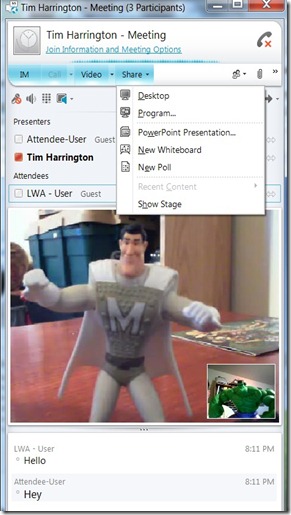
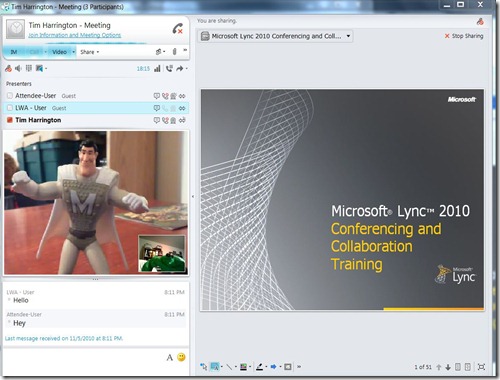
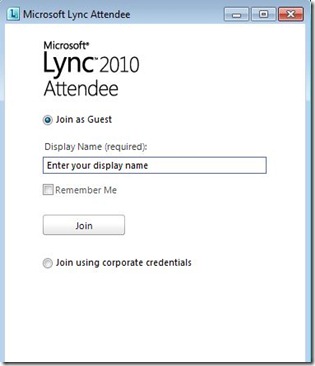
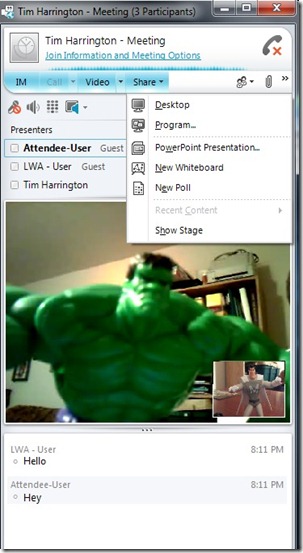
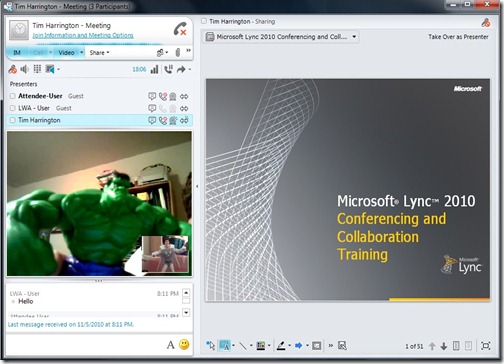
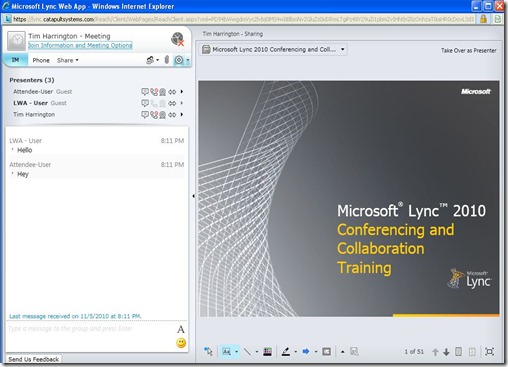
The following are some screenshots of a meeting that has a user joined from each client.  Note the options available and “look and feel” of each client.

Lync Client

Sharing Options:

LyncConf - LyncOptions

PowerPoint presentation upload:

LyncConf - Lync-ppt

Attendee Client

Login Page:

LyncConf - AC-Launch

Sharing Options:

LyncConf - Attendee-Options

PowerPoint presentation upload:

LyncConf - Attendee-ppt

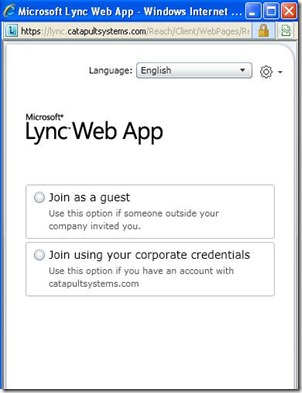
Lync Web App

Login Page:

LyncConf - LWA-Launch

Sharing Options:

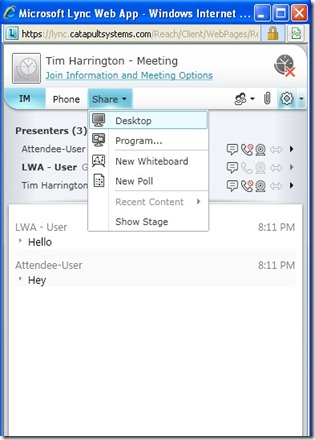
LyncConf - LWA - Options

Phone Options

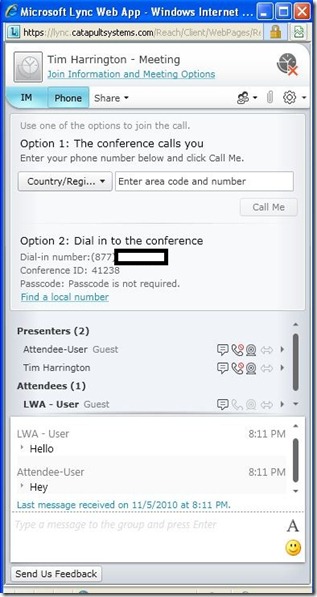
LyncConf - LWA-Callme-markup

PowerPoint presentation upload:

LyncConf - LWA-ppt

The new conferencing experience is a welcome improvement.  Hopefully less of our meetings will be troubleshooting connectivity problems as it was in the past!

Tuesday, November 2, 2010

Lync Environmental and Server Prerequisites

Now that Lync has RTM’d, it is time to start preparing for the introduction of Lync into your environment.  Let’s discuss what is required in your environment before getting started with Lync.

Active Directory Requirements

Even though Lync uses the new Central Management Store (CMS) to store configuration data for servers and services (instead of relying on AD Domain Services as in previous versions), Lync still stores items in AD DS.

Items stored in AD DS:

  • Schema Extensions
    • User object extensions
    • Extensions for OCS 2007 (and R2) classes to maintain backwards compatibility
  • Data
    • User SIP URI and other user settings
    • Contact objects for applications
    • Data published for backward compatibility
    • Service connection point (SCP) for the CMS
    • Kerberos Authentication Account

Supported Domain Controller OS:

  • Windows Server 2008 R2
  • Windows Server 2008 32-bit or 64-bit
  • Windows Server 2003 R2 32-bit or 64-bit
  • Windows Server 2003 32-bit or 64-bit

Forest and Domain Functional Level:

  • Windows Server 2008 R2
  • Windows Server 2008
  • Windows Server 2003 native mode

Supported Certificate Authorities:

  • Internal
    • Windows Server 2008 R2 operating system CA
    • Windows Server 2008 operating system CA
    • Windows Server 2003 Enterprise Edition operating systems with SP1 CA
    • Windows Server 2003 operating systems with SP1 stand-alone CA (supported, but not recommended)
  • Public
    • Must support use of Subject Alternative Names (SANs)

Supported AD Topologies:

  • Single forest with single domain
  • Single forest with a single tree and multiple domains
  • Single forest with multiple trees and disjoint namespaces
  • Multiple forests in a central forest topology
  • Multiple forest in a resource forest topology

Lync Servers Requirements

Supported Operating Systems:

  • Windows Server 2008 R2 (Stan./Ent./Datacenter)
  • Windows Server 2008 with SP2 64-bit (Stan./Ent./Datacenter)

Software installed automatically by the Lync Installer:

  • Microsoft Visual C++ 2008 Redistributable
  • Microsoft Visual J# version 2.0 Redistributable
  • URL Rewrite Module version 2.0 Redistributable
  • SQL 2008 Express SP1
  • SQL 2008 Native Client

Additional Windows software required by all Lync Roles:

  • Windows Powershell 2.0 (already installed on 2008 R2)
  • Microsoft .NET Framework 3.5 with SP1 (Windows Feature in R2)
  • Updates to .NET 3.5 SP1 available in Windows Update
  • Windows Installer Version 4.5 (already installed on 2008 R2)

Additional Windows software required by Front-End or Standard Edition Servers:

  • IIS (Required)

Static Content

Tracing
Default Document Windows Authentication
HTTP Errors Request Filtering
ASP .NET Static Content Compression
.NET Extensibility IIS Management Console
Internet Server API (ISAPI) Extensions IIS Management Scripts and Tools
ISAPI Filters Anonymous Authentication
HTTP Logging Client Certificate Mapping Auth
Logging Tools  

You can install the above components from an elevated PowerShell command by running (assuming Windows 2008 R2):

  1. Import-Module ServerManager
  2. Add-WindowsFeature Web-Server, Web-Scripting-Tools, Web-Windows-Auth, Web-Asp-Net, Web-Log-Libraries, Web-Http-Tracing, Web-Stat-Compression,Web-Default-Doc, Web-ISAPI-Ext, Web-ISAPI-Filter, Web-Http-Errors, Web-Http-Logging, Web-Net-Ext, Web-Client-Auth, Web-Filtering, Web-Mgmt-Console
  • Message Queuing (if Archiving or Monitoring will be deployed)
    • Message Queuing Server
    • Directory Service Integration
  • Windows Media Format Runtime (if conferencing will be deployed)
    • Installer will automatically install, but will require a reboot –OR-
    • %systemroot%\system32\dism.exe /online /add-package /packagepath:%windir%\servicing\Packages\Microsoft-Windows-Media-Format-Package~31bf3856ad364e35~amd64~~6.1.7600.16385.mum /ignorecheck

SQL Servers for Lync Enterprise, Archiving, Monitoring databases

  • SQL 2008 Stand./Ent with SP1 (64-bit)
  • SQL 2005 Stand./Ent with SP3 (64-bit)

Hope this helps get you started.  As always, comments welcome!

Monday, November 1, 2010

Lync Launch Event – Nov. 9th

LyncLogo

catapultlogo


I will be speaking at a Lync Launch event for Catapult Systems on Nov. 9th in San Antonio, TX.  If you are in the area, please register and stop in.

Here is the invitation and registration link.

Catapult Systems will also have Lync Launch events in Austin (11/10), Orlando (11/16), and Ft. Lauderdale (11/18). If you are in those areas, go to our events page to find the invitation for your city.

Wednesday, October 27, 2010

Lync 2010 has RTM’ed!

lynclogo2

Today the Microsoft UC team has announced that Lync 2010 has reached Release to Manufacturing (RTM).  This means that all the features and code are final.

The announcement from the UC team can be read HERE.

The next major milestone is General Availability (GA).  This is set for November 17th and will line up with the virtual worldwide launch event. 

You can find more information about the launch event and Lync product information by going to the official Microsoft Lync product page HERE.

I look forward to blogging more about Lync in the future!

Tuesday, October 26, 2010

Adding Context to Lync Conversations

The wonderful thing about Lync is that you can initiate communication across all available modalities no matter what application you are currently working in.  While this has been true since OCS, Lync has taken it a step further.

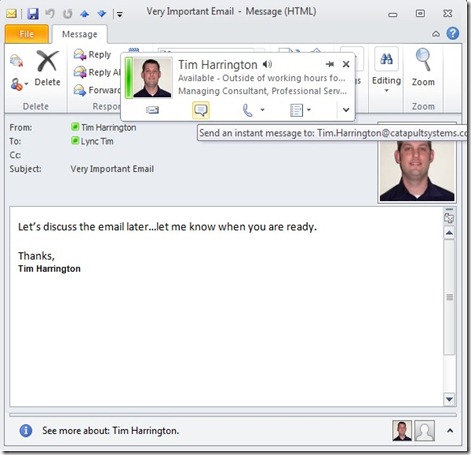
Take the scenario of when you are digging through your emails and need to respond to one.  You know that if you reply with an email, the conversation is going to go back and forth a few times.  So you would rather take care of it in an IM conversation.  By hovering over the presence icon, you can initiate an IM conversation.

Conv-Lync-email-hover

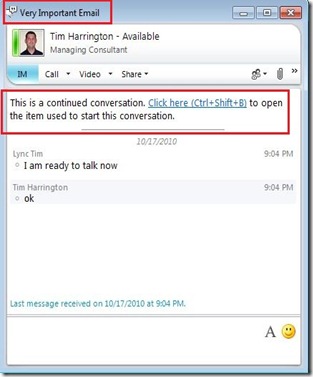
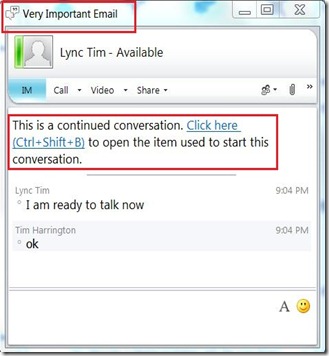
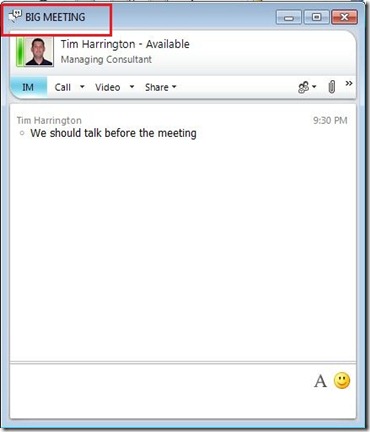
When the IM window opens, two things happen.  The IM window is labeled with the same subject as the email and a link is provided for any participants to open up the email that is being referenced. 

Conv-Lync-IM-markupConv-Tim-IM-markup

This is great because when the recipient gets the IM, they can immediately click the link and read the email in context. 

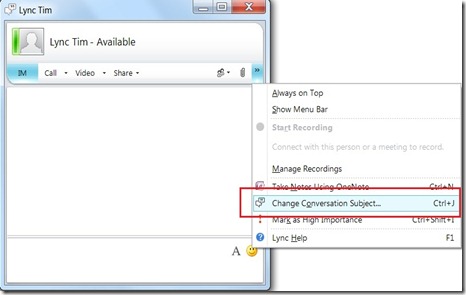
Users can also define the subject of any conversation.  When starting a conversation, the Conversation Subject can be defined by selecting the options and selecting “Change Conversation Subject”

Conv-addcontext-markup

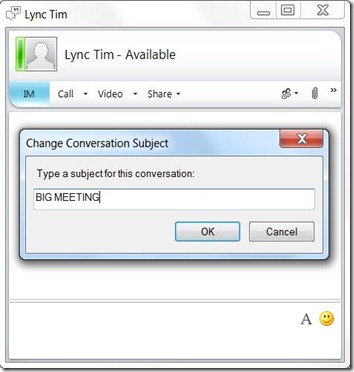
The user can then define the subject of the conversation:

Conv-addcontext-subject

When the recipient gets the toast, the Conversation Subject is shown:

Conv-addcontext-toast-markup

Now the conversation window will be labeled with that subject:

Conv-addcontext-IM-markup