Monday, July 26, 2010

Disconnected Mailboxes in Exchange 2007/2010

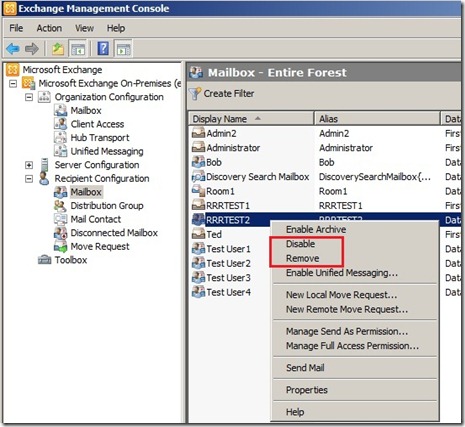
Where did the mailbox go?  Have you asked that question after you have disabled or removed a user from Exchange?  So let’s take one step back.  There are two options to disconnect a mailbox from a user in Exchange 2007/2010: Disable or Remove.  The following shows the options from the Exchange EMC.

Disconnected-EMC-mailbox-del-rem-markup

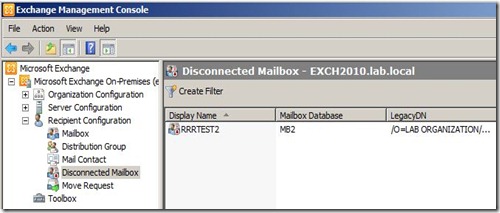
If you select Disable, the just disconnects the mailbox for the AD account.  If you select Remove, this actually deletes the AD account.  Once either of these are selected the mailbox becomes “disconnected”.  A disconnected mailbox is a mailbox object that is not associated with an AD user account.  Naturally, the administrator will then navigate to the Recipient Configuration –> Disconnected Mailbox node and expect to find the newly disconnected mailbox.  Unfortunately, the node is empty.
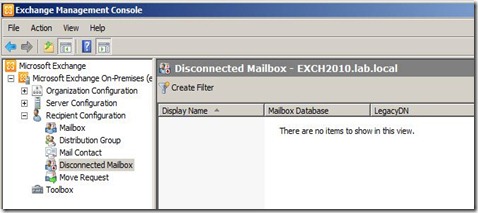
Disconnected-EMC-emptySo why is this node empty and when will I see the mailbox?  The mailbox will appear after the Online Maintenance window defined for the Exchange server.  If the administrator wants the mailbox to appear right away, the following command can be run in the EMS:

Clean-MailboxDatabase “DatabaseName” or Get-MailboxDatabase | Clean-MailboxDatabase (to clean all databases)

Disconnected-EMS-CleanIf this is an Exchange 2007 server and multiple servers or storage groups are present then that information will need to be included in the command:

Clean-MailboxDatabase “Server\Storage Group\DatabaseName”

After that, refresh the Disconnected Mailbox node the mailbox appears.
Disconnected-EMC-mailboxThat’s it!

Thursday, July 22, 2010

OCS July 2010 Updates Released (CU6)

The latest round of OCS updates are available for download.  Here are the details…

Communicator Client  - KB 2028888 (version .206): HERE

Server Updates – KB 968802: HERE
  • A/V Conferencing
  • Core Components
  • Communicator Web Access
  • Conferencing Attendant
  • Response Group Service
  • Standard/Enterprise Edition Server
  • Standard/Enterprise Edition Server Back-End
  • UC Managed API 2.0 Redist
  • Web Conferencing Server
Phone Edition KB 2267962 (version .207): HERE

Group Chat – KB 2032881 (version .206): HERE
  • Includes updates for the server, client, and admin tool

Tuesday, July 20, 2010

Anonymous Relay with Exchange 2007/2010

I have seen this situation/question come up over and over again so I decided to write a blog post on it.  The question: “How do I configure Exchange to receive email from the Internet or from a MFP scanner?  You might think this is pretty straight forward, but I have seen this misconfigured over and over. 

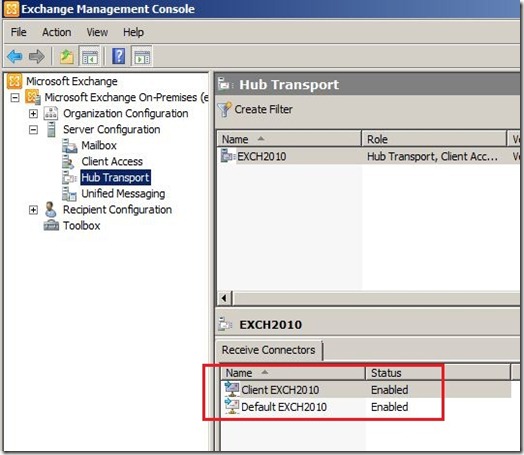
Exchange 2007/2010 comes with two default receive connectors installed per HUB Transport server: “Default Servername” and “Client Servername”.  The “Default Servername” connector is used for all connections from other HUB or Edge Transport servers in the organization.  The “Client Servername” connector is used for all SMTP connections from all non-MAPI clients, such as POP or IMAP.  This is the default view for every HUB Transport server.

Anonymous-Default-markup

Most likely a connector from the Internet or a MFP scanner will need to connect to Exchange via SMTP as an anonymous user or with basic authentication.  Let’s discuss anonymous connections.  I have seen other posts instruct administrators to allow anonymous connectivity through the “Default Servername” receive connector.  My advise: Leave the two default receive connectors alone and add a new receive connector to manage all anonymous connectivity and all non-default connectivity.  Allowing anonymous relay is a security risk and should be controlled if needed.  By creating a separate receive connector I get a warm fuzzy because I have segmented off all non-default traffic to its own connector and I can create a whitelist of IP addresses that are allowed to use it.

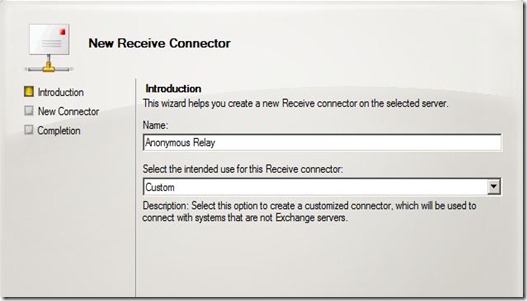
So, let’s get started… In EMC, navigate to the Server Configuration –> Hub Transport node and select New Receive Connector in the Action pane.  This will open the New Receive Connector wizard.  Let’s name the connector “Anonymous Relay” and select Custom from the drop down.

Anonymous-Wiz1

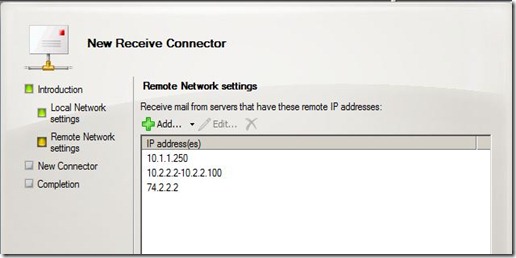
On the Remote Network Settings page, delete the default all-inclusive IP range and add the IP addresses that you want the connector to allow connectivity.  We will add our MFP scanner and our hosted SPAM/Hygiene service.  Note that you can also add IP ranges and whole subnets.

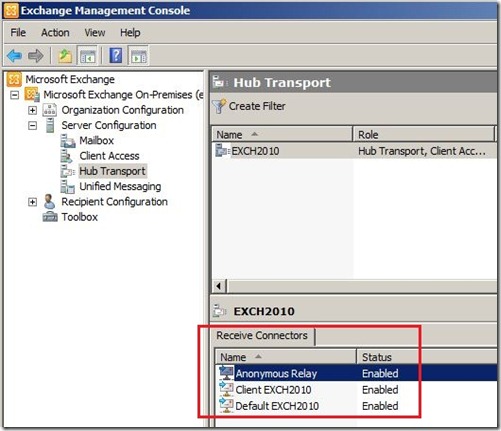
Anonymous-Wiz2 Complete the wizard.  Once the connector is created it will show along with the default receive connectors.

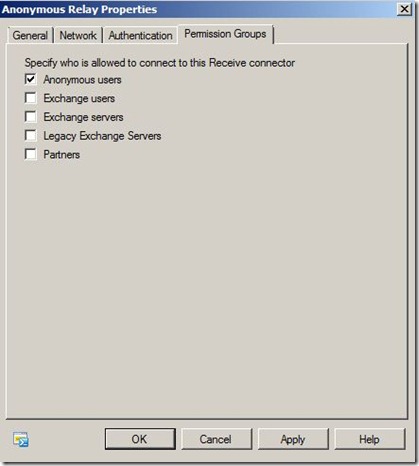
Anonymous-Connector-markup Now to enable anonymous connectivity, right-click on the connector and select properties.  Select the Permission Groups tab and check the Anonymous Users check box.

anonymous-Connector-prop-anonymous We are almost done.  Before the last step, we could have created the exact same connector by running the following command in EMS.

New-ReceiveConnector –Name “Anonymous Relay” –Usage Custom –PermissionGroups AnonymousUsers –Bindings ‘0.0.0.0:25’ –RemoteIpRanges ‘10.1.1.250’,’10.2.2.2-10.2.2.100’.’74.2.2.2’

Anonymous-EMS-create-cropNow the last step…allow anonymous relay through the connector.  Yes, this is the step that most people forget.  Anonymous relay is not enabled by default.  The previous Anonymous Users setting was just for connectivity permission.  To allow Anonymous relay, the following command is executed from EMS.

Get-ReceiveConnector “Anonymous Relay” | Add-ADPermission –User “NT AUTHORITY\ANONYMOUS LOGON” –ExtendedRights “Ms-Exch-SMTP-Accept-Any-Recipient”

All done, now we have created a specific receive connector for anonymous relay and can control what devices are allowed to use it.

Wednesday, July 14, 2010

Mailbox Move Requests in Exchange 2010

Exchange 2010 introduces the concept of Move Requests instead of the traditional Mailbox Moves found in earlier versions of Exchange.  This is a complete redesign for how mailbox moves are managed.  So why the change?

  • Mailbox moves are now asynchronous and are carried out by the Exchange Mailbox Replication Service located on each CAS server (instead of being carried out by the actual cmdlet or console)
  • Mailboxes are kept online during the asynchronous moves (users do not lose their connection to their mailbox during the move and can continue to send and receive email)
  • Items in a mailbox’s Recoverable Items folder are moved with the mailbox
  • Content indexing starts to scan the mailbox as soon as the mailbox begins to move
  • Throttling can be configured for each mailbox replication service, database or server
  • Moves can be managed from any Exchange 2010 server
  • Mailbox content doesn’t move through the server creating the request, this allows shut down of the console during the mailbox move

There are two types of Move Requests: Local and Remote.  Local is used for any mailbox moves within the same Exchange Organization.  Remote is used for any cross-forest migrations.  A Move Request can be initiated two different ways: from EMC and EMS.

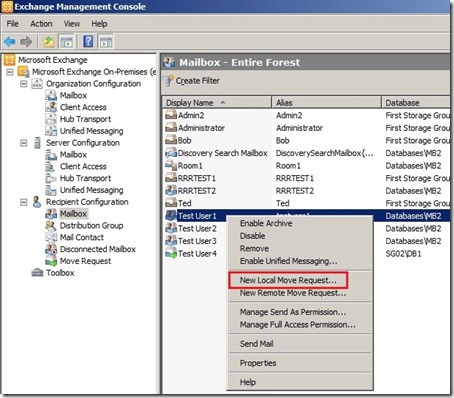
From EMC, navigate to the Recipient Configuration –> Mailbox node.  Right-click on a mailbox and select New Local Move Request.  After the wizard is complete, a new Move Request will be created and the mailbox will be moved.

moveRequest-EMCSelect-markup

The same function can be performed in the EMS by running the following command:

New-MoveRequest –Identity Alias –TargetDatabase “DatabaseName”

moveRequest-EMS-executed Note that if a database name is not specified, a random database is selected.

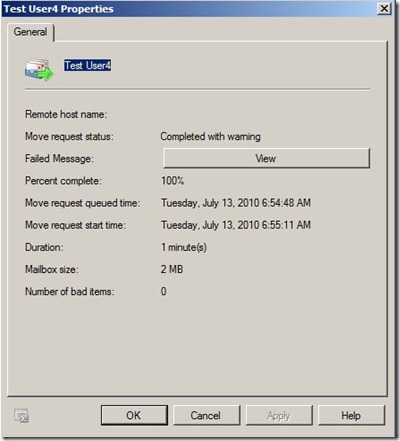
Status of the Move Request can be viewed by navigating to the Recipient Configuration –> Move Request node and selecting the properties of the Move Request. 

MoveRequest-status

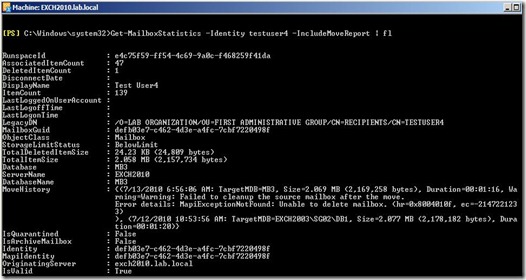
Also a complete report can be generated from the EMS by running the following command:

Per Mailbox:  Get-MailboxStatistics –Identity Alias –IncludeMoveReport | flMoveRequest-EMS-report

For a complete report for all moves including specific fields and outputting to a text file:

Get-MoveRequest | Get-MoveRequestStatistics | Select DisplayName, Status, TotalItemSize, TotalMailboxItemCount, PercentComplete, BytesTransferred, ItemsTransferred | Out-File –FilePath “C:\temp\FullMoveUserLog.txt”

One thing that is different is that the Administrator will have to clear out any Move Requests if a mailbox needs to be moved again or a database deleted.  Through the EMC, if a Move Request still exist, the administrator will not even have the option to create a New Local Move Request.  From the EMS, the error that an administrator will see if the Move Request is not cleared out is shown below.

moveRequest-EMSerror Move Request can be cleared either from the EMC or EMS.  From the EMC, simply right-click on the Move Request within the Recipient Configuration –> Move Request node and select Clear Move Request.  From the EMC, the following command can be executed to clear any Move Request.

Get-MoveRequest | Remove-MoveRequest –Confirm:$false

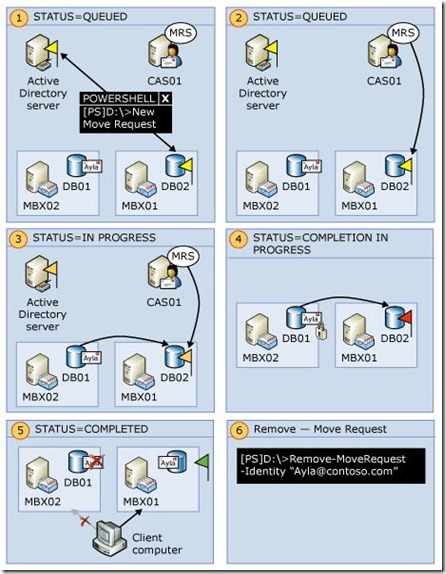
The complete Move Request workflow is shown in the following diagram (courtesy of Microsoft):

MoveRequest-Process

Friday, July 9, 2010

Arbitration Mailboxes and Moderated Email – Part 2

In Part 1 of this blog, we talked about how to manage arbitration mailboxes that are created by the default installation of Exchange 2010.  One of the main purposes of arbitration mailboxes is to manage approval workflow.  The arbitration mailbox is used to store all email messages that are waiting approval by message moderators. 

In previous versions of Exchange, administrators used Message Delivery Restrictions (which still exist in Exchange 2010) to manage what senders could send emails (whitelist) or could not send emails (blacklist) to specific mailboxes, distribution groups, and contacts.  Message Moderation (introduced in Exchange 2010) allows administrators to designate approvers (moderators) to decide whether or not an email should be delivered to specific users, distribution groups. or contacts.  This introduces a human element into the process.

For this post, we will be examining the process to enable a distribution group for Message Moderation and look at the workflow.

Scenario: The distribution group “TestGroup1” will be enabled for Message Moderation and the user “Test User 3” will be configured as the Moderator of the group.

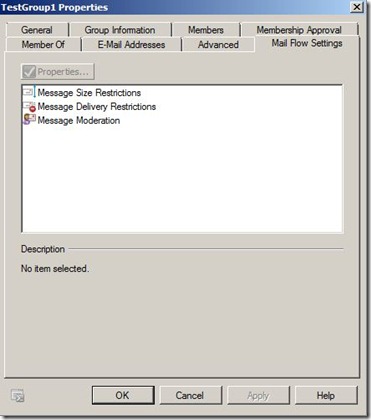
To enable the distribution group for Message Moderation, we will navigate to the Recipient Configuration –> Distribution Group node in the EMC.  Next, we right-click and select properties on the group and then navigate to the Mail Flow Settings tab.

Arbitr-Part2-DistrProp

Notice the familiar Message Delivery Restrictions selection, but today we will select Message Moderation.

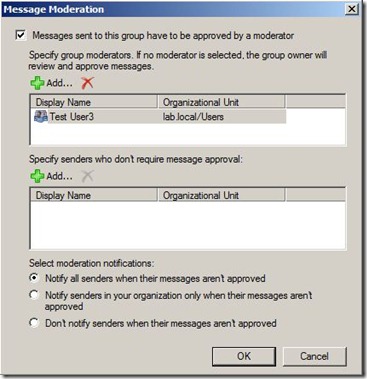
Arbitr-Part2-DistrProp-MessMod

From this dialog, we will select “Test User 3” as the moderator of the group.  Notice we can specify multiple moderators and that we also have the option to specify certain users with the ability to bypass moderation.  We can also configure the notification actions.

Now that the group is configured, let’s send an email to this group.  “Test User 4” will send an email to “TestGroup1”.  Notice that once the moderated group is added in the To field, a MailTip is added to show the sender that this is a moderated group.

Arbitr-Part2-Email-Mailtip-markup

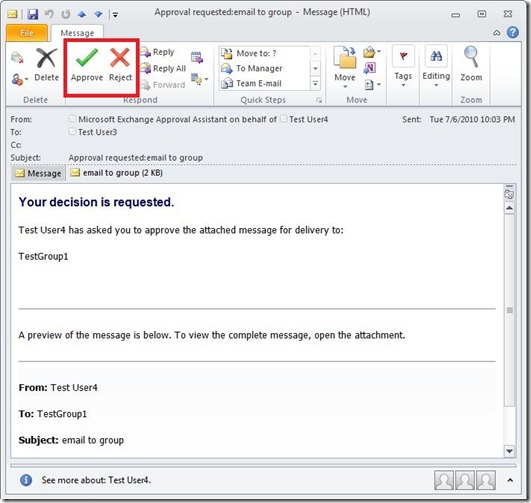
Now that the email is sent, we switch over to “Test User 3” Outlook client.  We have a new email asking “Test User 3” to approve or reject this email.

Arbitr-Part2-Email-AppRej-markup

The moderator has three options at this point: approve, reject, or reject with comments.  Also note that the original message is attached to the email for review.  If rejected, the originator will get a rejected notification.

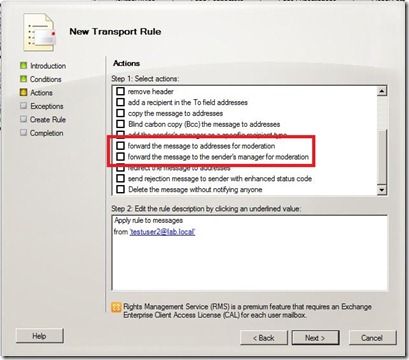
Moderation can also be configure in the Transport layer for more customized scenarios by creating Transport Rules and selecting the actions for moderation.

Arbitr-Part2-Transport-markup Note that moderation will only work with Exchange 2010 HUB servers, so in a coexistence scenario, all email must first flow through an Exchange 2010 HUB server.

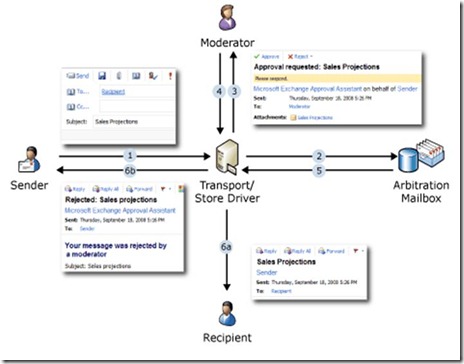
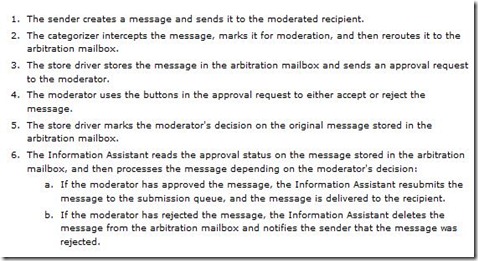
To review the overall workflow, the following diagram maps out each step of the process (courtesy of Microsoft documentation).

Arbitr-Part2-MS Workflow-largeArbitr-Part2-MS Workflow-Steps

Saturday, July 3, 2010

Arbitration Mailboxes and Moderated Email – Part 1

As more and more admins install Exchange 2010, they are quickly faced with an error message.  What is the first thing that admins want to do when configuring the mailbox role?…create production mailbox databases and delete the default database that Exchange installed.  Well, Exchange 2010 installs a few special mailboxes on the first database.  Oh yeah…and you probably won’t even realize that they are there since they do not show up in the EMC.

Part 1 of this post will show how to manage these special mailboxes and Part 2 will cover how we actually utilize them.  Yes…these mailboxes are actually useful besides just keeping you from deleting that first mailbox database.  These mailboxes are called “arbitration” mailboxes and are used for managing approval workflow which we will go into further in Part 2.

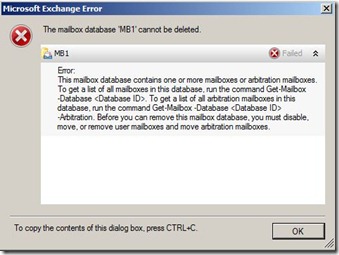
So what error do we get when trying to delete this “empty” database? (your actual mailbox name will be different from the one I am using)
Arbitr-Part1-Error
Again, according to the EMC there are no mailboxes in this database.  Let’s go to the shell and run the following command to see what mailboxes are really there.

Get-Mailbox –database “MB1” –Arbitration
Arbitr-Part1-EMS-Arbitr
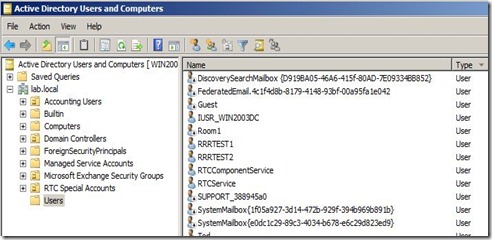
So we have some GUID looking System mailboxes to deal with.  These are the arbitration mailboxes that need to get moved before we can delete the database.  When you prepped the domain during the installation of Exchange 2010, new AD objects were created and are linked to these mailboxes.  You can view these from AD Users and Computers in the Users container.
Arbitr-Part1-ADUC-1
These match the ones from the EMS command output.  So let’s get these moved over to another production database so that we can delete the original database.  We can do this by running the following command.

Get-Mailbox –database “MB1” –Arbitration | New-MoveRequest –TargetDatabase “MB2”
Arbitr-Part1-EMS-Arbitr-Move
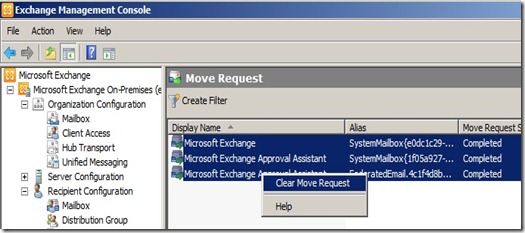
Once the mailboxes are moved, the move requests will have to be cleared before the database can be deleted.  By navigating to the Recipient Configuration –> Move Request node in EMC, we can clear the request.
Arbitr-Part1-ClearMove
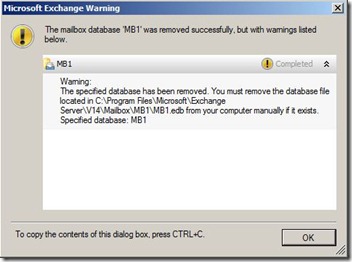
Now we can finally remove the database successfully!!!
Arbitr-Part1-RemoveDatabase
Part 2 covers what these mailboxes are and how we can utilize them.