Wednesday, August 24, 2011

Exchange 2010 SP1 Update Rollup 5 Available

An update for Exchange 2010 SP1 has just released and can be downloaded at: Exchange 2010 SP1 Update Rollup 5 Download. This will take you Exchange version up to 14.1.339.1

For a description of all the included fixes, see KB 2582113

For those of you running DAGs, please see the following article: Applying Updates to Exchange 2010 SP1

If you are running Forefront, it is important to disable Forefront protection during the update:

  • Before running patch: fscutility /disable
  • After running patch: fscutility /enable

NOTE: Update Rollup 6 for Exchange 2010 SP1 is currently scheduled for October 2011

Wednesday, August 17, 2011

Viewing and Reverting Default Global Policy Settings in Lync Server

Have you been in the situation where you have messed around with policy settings and wish you could refer to what were the default settings?

Do you wish you could revert (or reset) the global policies back to their original settings?

If so, this blog post is for you.  Lync has provided a few easy ways to accomplish these tasks.  Note that the commands will only work on Global Policies.

Determining Default Global Policy Settings

By running Get-CsUser in the Lync Management Shell, you will notice that a user can be assigned many different kinds of policies.  For example, Voice Policy, Client Policy, Conferencing policy, and so on.

Lync Pol - Get-CsUser - markup

If the Policy is blank, that means that the user will apply whatever is defined in the Global policy.  You can find out the settings in a Global policy by running the Get-CsXXXPolicy –Identity Global.  For this blog I will be using the Voice Policy as my example.

Running: Get-CsVoicePolicy –Identity Global | fl, I can see what is currently configured.

Lync Pol - Get-CsVoicePolicy

The –InMemory parameter lets you create a policy that exists only in memory.  This lets you view the default values for the specified policy.  Note this will not actually create a policy.

Running: New-CsVoicePolicy –Identity “DiscoverDefaults” –InMemory

Lync Pol - New-CsVoicePolicy-In Memory

This allows me to compare what I have set in my Global policy to what the default settings are.

Revert Any Global Policy Back to Default Values

Although you cannot remove a global object you can use a Remove-CsXXXPolicy cmdlet to reset all the properties in that object to their default values.  If you run the Remove-CsXXXPolicy cmdlet against any policy besides the Global policy, it will delete your policy.

Running: Remove-CsVoicePolicy –Identity Global will reset the Global policy back to its original values

Lync Pol - Remove-CsVoicePolicy Global

We can now check the settings of the policy by running:

Get-CsVoicePolicy –Identity Global | fl

Lync Pol - Get-CsVoicePolicy after reset

This post showed how to check what default values are in the Global policies and also showed how to revert a Global policy back to its default values.

Wednesday, August 10, 2011

Determine Admin Role Needed to Run a Command in Lync

Lync Server has adopted the Role Based Access Control (RBAC) administrative model to allow for easy delegation of administrative tasks.  To get you started, there are some default groups created:

Lync Admin Role - list

Note that you can create your own custom roles if desired by using the “New-CsAdminRole” command. 

There is a simple command that can be used to determine what role is needed in order to execute specific commands.  This will allow you to identify what exact role a user will need to run the desired task.

Use the following command:

Get-CsAdminRole | Where-Object {$_.Cmdlets –match “command”}

Here are a few examples…

When running the command with “New-CsLocationPolicy”, you will notice that CSAdministrator, CSVoiceAdministrator, or CSServerAdministrator can run this command.

Lync Admin Role - cmd1

When running the command with “New-CsClientPolicy”, you will notice that CSAdministrator or CSServerAdministrator can run this command.

Lync Admin Role - cmd2

Tuesday, August 2, 2011

Delegating Users the Ability to Change Custom Audio Prompts for Auto Attendants in Exchange 2010 Unified Messaging

Exchange Unified Messaging (UM) is very particular about what types of audio files it will accept as custom greetings.  In fact, the requirement for custom greetings is that the file is encoded as a Linear PCM, 16-bit, 8 kHz, mono .wav file. 

Now you next question is, how do I record a file in that format AND get it to the Exchange server?  The old way to do it is to download an audio recording software, configure the settings and record the file.  Here is a good blog if you want to use that method.

But if you have Auto Attendants that change frequently and you want to delegate that task to your user community, you will not want to use the software recording method. 

Note: the following steps will be shown using GUI tools only, but all steps can be completed with powershell commands.

Delegating rights to a regular user account to allow audio prompt administration

Exchange 2010 offers Role Bases Access Control (RBAC) to easily delegate specific rights to a user to perform specific tasks.  Note that users delegated to administer UM prompts will have to be enabled for UM themselves.  Users will authenticate using their extension and PIN in order to modify the prompts.

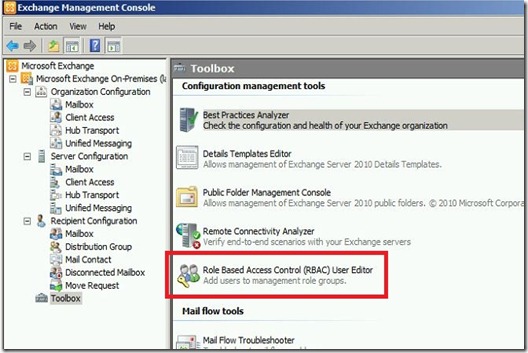
The first step that you want to perform is to create a new role.  In my example, I am naming the role “UM Prompt Administrators”.  First, open the EMC and navigate to the Toolbox node.  Select RBAC User Editor and log into the ECP:
ExchUM - RBAC Toolbox - markup

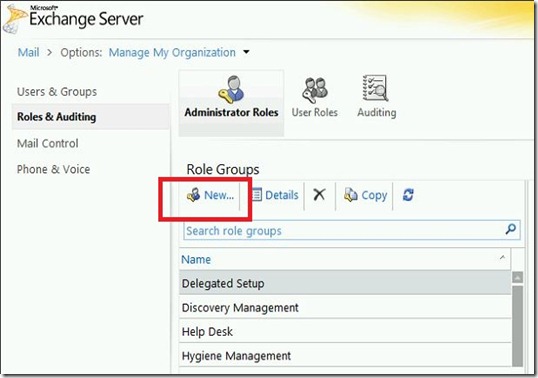
Once logged in, select the “New…” button to create a new Role Group:
ExchUM - RBAC New - markup

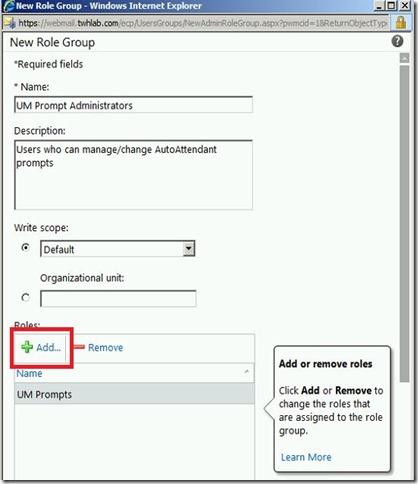
Enter in the Role Group name: “UM Prompt Administrators” and select the “Add…” button to add roles:
ExchUM - RBAC New UM role 1 - markup

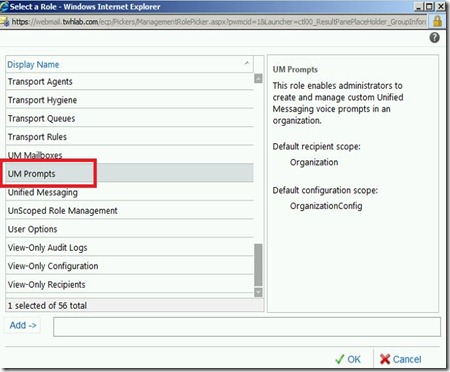
Add the “UM Prompt” role:

ExchUM - RBAC role add - markup

Then add the users that will need to manage UM prompts":
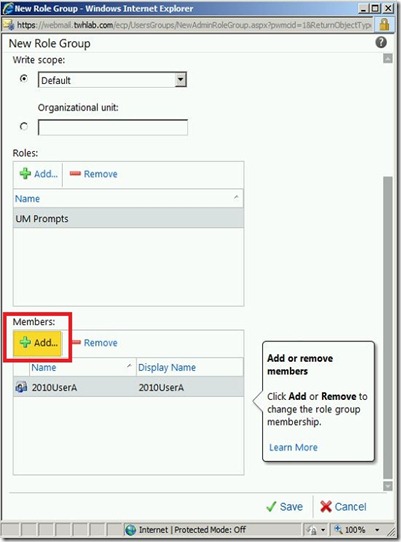
ExchUM - RBAC New UM role 2 - markup

This will create a new AD group in the "Microsoft Exchange Security Groups OU:
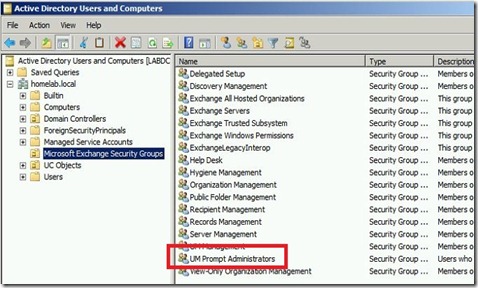
ExchUM - AD group - markup

Now you can manage users by using the ECP or directly through the AD group:
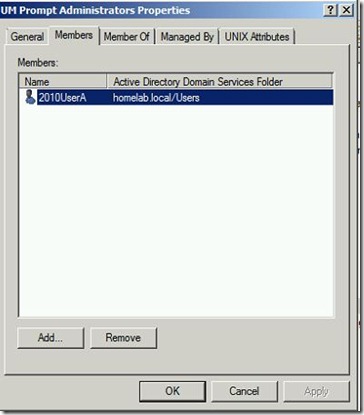
ExchUM - AD group prop

Enable the UM Dial Plan to allow TUI (telephone user interface) editing

From the EMS, run:

Set-UMDialPlan –identity “Dial Plan Name” –TUIPromptEditingEnabled $true

ExchUM - cmd dialplan enable

Seed the audio prompts with a custom audio file

Before you can modify the audio prompts through the telephone, a custom greeting already has to be configured.  You will only be able to modify the prompts that have been changed from the default greeting.  The easiest way to do this is to select any of the .wav files already on the Exchange server.  The files are located in (if you have a different language pack installed, the “en” folder will be a different language abbreviation):

<Program Files>\Microsoft\Exchange Server\V14\UnifiedMessaging\prompts\en

To keep things organized and descriptive, I will copy one of the preexisting files and rename it to what the greeting will be.
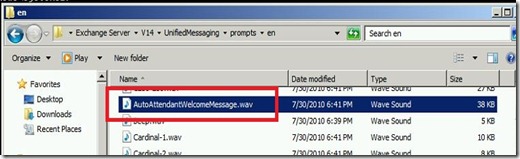
ExchUM - file location wav file - markup

Next, open the Auto Attendant and click the Greetings tab.  Then select the custom greeting file:
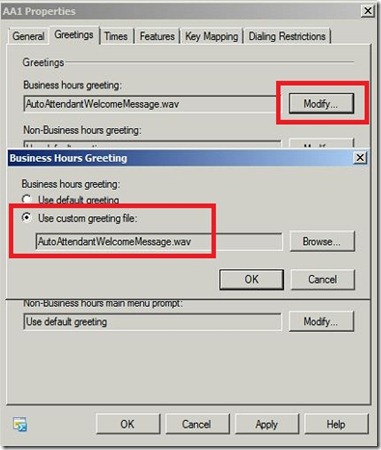
ExchUM - AA cust greeting - markup

Use telephone to modify audio prompts

Now you are ready (or your delegated user) to modify the audio prompts.  Here is the procedure:

  1. Call the extension\phone number associated with the Auto Attendant that you want to modify
  2. While the initial greeting is playing (the one you just selected), press # then * on the telephone keypad
  3. You will then be prompted for your extension and PIN number.  This will authenticate you to change the audio prompt menu.
  4. At this time you will be presented with options to change the audio prompts that have been customized from the default greetings

The modified audio prompts will then be saved in the following location:

<Program Files>\Microsoft\Exchange Server\V14\UnifiedMessaging\prompts\cache
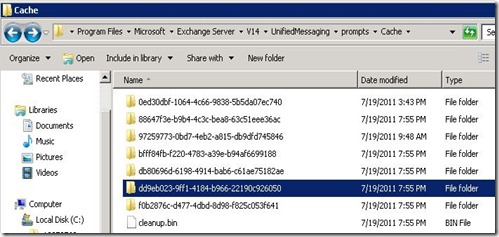
ExchUM - file location cust prompts

This post described how to:

  1. Delegate regular users the ability to manage Auto Attendant audio prompts
  2. Use a regular telephone to modify and record new greetings for Auto Attendants

Thursday, July 28, 2011

Rereleased: Exchange 2010 SP1 Update Rollup 4 (v2) Available

The Update Rollup 4 for Exchange 2010 SP1 has been rereleased and can be downloaded at: Exchange 2010 SP1 Update Rollup 4 (v2) Download. This will take you Exchange version up to 14.1.323.6

For a description of all the included fixes, see KB 2579150

For those of you running DAGs, please see the following article: Applying Updates to Exchange 2010 SP1

If you are running Forefront, it is important to disable Forefront protection during the update:

  • Before running patch: fscutility /disable
  • After running patch: fscutility /enable

Tuesday, July 26, 2011

Lync July 2011 Server and Client Updates Released

The Lync team has released server and client updates for July 2011. Here are all the details:

Server Updates (7577.166) – Download – KB2493736

  • Core Components
  • Conferencing Attendant
  • Conferencing Server
  • Web Components Server
  • Standard/Enterprise Edition Server
  • Web Conferencing Server
  • UCMA 3.0 Runtime

Note: Use the cumulative LyncServerUpdateInstaller.exe to install the updates to make sure all needed updates are applied.

Phone Edition Updates

Clients

Group Chat

Thursday, July 21, 2011

Completely Disable IM Archiving and Outlook Conversation History in Lync

Compliance in the enterprise is a funny thing.  Some companies take the approach that they have to save everything forever.  Some take the opposite approach that they only keep limited backups, control what the user can save, and purge everything else.  This post will describe how to control and prohibit users from saving IM’s to Outlook or their local folder structure.

There are three major ways to archive/save IM conversations for Lync:

  1. Install and configure the Lync Archiving Role
  2. Allow client side “Conversation History” through the Outlook client
  3. Allow users to save an IM to a file

We will not go into #1 since if you do not install or configure the Archiving role, then IM’s will not be centrally saved within a SQL database.

Disable Conversation History in Outlook

By default when Lync is installed, Lync integrates with Exchange/Outlook and creates a Conversation History folder to save all conversations including IMs, audio, video, and web conferences.  Also by default, all conversation logs are set to save in this folder.

Lync Dis Arch - Conv History

These options can be set in the client by the user:

Lync Dis Arch - client option - markup

The administrator can disable these settings from user control by setting a Lync client policy which gets applied to the client through in-band provisioning.  There are two parameters that can be set here, one for IM conversations and one for call logs.  The following command disables the automatic saving of both options:

Set-CsClientPolicy –Identity Test –EnableIMAutoArchiving $false –EnableCallLogAutoArchiving $false

Lync Dis Arch - cmd disable autoIM

Note that I am setting a specific policy which is already granted to my users.  You could easily set these parameters on the Global Client Policy to apply to everyone.

After applying the policy, the options are now unchecked and disabled from user control:

Lync Dis Arch - client option disabled - markup

With these policies configured, a user still has the option of saving IM conversation manually.

Disable the Ability to Save IM Conversations Manually

When in an IM conversation, a user has the option to save an IM to Outlook or as a separate file:

Lync Dis Arch - Client Save As - markup

The administrator can disable this option by setting a Lync client policy which gets applied to the client through in-band provisioning. The following command disables the ability to manually save IM conversations:

Set-CsClientPolicy –Identity Test –DisableSavingIM $true

Lync Dis Arch - cmd disable saving IM

Note that I am setting a specific policy which is already granted to my users. You could easily set these parameters on the Global Client Policy to apply to everyone.

Now the option is no longer available within the IM conversation:

Lync Dis Arch - Client Save As Disabled

This post described how to disable IM conversation logging and saving.  Hope this helps.